It is a cool crisp and wet morning here in St. Louis. Summer has decidedly turn to fall. I pulled my terry cloth bath robe on over my pajamas and sat with my coffee in the sun room this morning. I love this time of year. Most people I have talked with do. At some point in almost every conversation this past week, the change in weather and how this is the favorite time of year has come out. This morning, as I was sitting with my coffee, in my robe and pjs with the screen door between me and the outdoors, I thought about how difficult most change is for people – myself included – but the the change in season is almost always not only welcomed but celebrated. Something to ponder as I drink more coffee, exchange the pjs for sweat pants and a long-sleeved tee… and robe, and relax, knowing that there is nothing so earth-shatteringly important to do outside that it need be done in the on-again, off-again rain. I love those lazy days.
Since taking down those large trees (and I still haven’t managed to move some of the larger wedges of wood out of my yard), I have been taking smaller equipment – hand saws and extension saws to trees.
I cut down the redbud I planted just outside my bedroom window 8 years ago. It has gotten so big it is encroaching on the evergreen bush and is resting on my roof. Not good for the roof or keeping pests at bay. Low hanging limbs and those branches that aren’t facing skyward are also getting he ax (or the saw) and already I have noticed increased sun to my veggie garden.
I am trying to be careful not to add too much sun to the windows in the house, and so I am being very careful and selective in my cuttings. The reason I love all the trees on the South side of my house is that during the summer it acts as a natural shade and keeps my house cooler. During the winter, when the leaves are off the tree, the sun shines in the windows and helps to heat the house.
When I moved here the patio was full shade. Now it is full sun. I guess I will eventually need to buy a patio table with a big umbrella. I guess there are worse things to have to worry about.
Posted in Environment, Gardening | Leave a Comment »
Several large trees were cut down yesterday. What a relief! They were potential hazards to my house and garage. There is still much clean-up to do and wood to be moved either to the wood racks or someplace out of the way to be cut for firewood next time I get my hands on a chainsaw.
Tree #1
 After (the stump with the plants on it)
Believe it or not, only one tomato plan was harmed when this fell. The raised bed itself looks like it will require a bit of fixing. I hauled quite a bit of wood, and am now even using a “chunk” as a table (see photo above bottom right.)
The one downside of taking down one of the large trees is that it was where my laundry line was attached. Wet clothes in the washer and no where to hang them…
Tree #2
Before
After – the great leaning tree is gone!
Posted in Environment | 3 Comments »
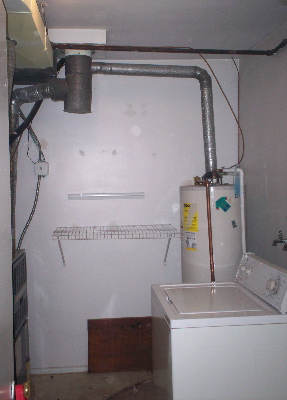
I have a very small laundry room (8′ x 10′) that also houses the hot water heater, the furnace, and what once was the electronic air cleaner (and now holds a 5″ air filter,) my washing machine and a large storage unit I (and friends) built a number of years ago. This room has also become a bit of a junk room.
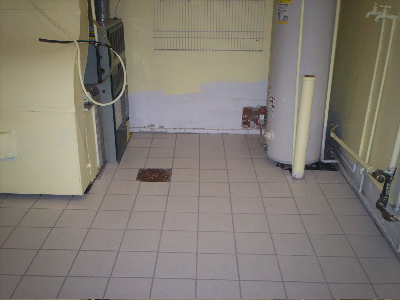
Two years ago I started to work on this room. I tore out a closet (see before pic below) and began painting the room. It has been half painted for these two years.
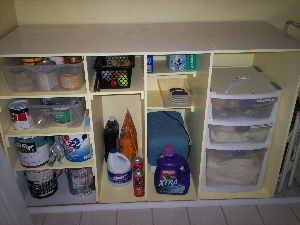
Some friends and I built a large storage unit that is supposed to act as a folding/air drying table as well. It houses paint and other items that one normally finds in a utility room. The top never got tiled, and became another place to put junk.
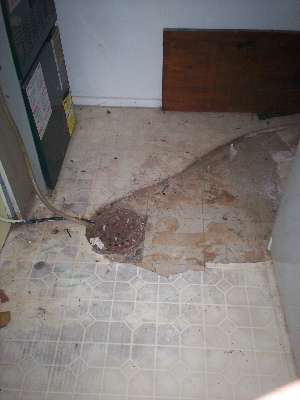
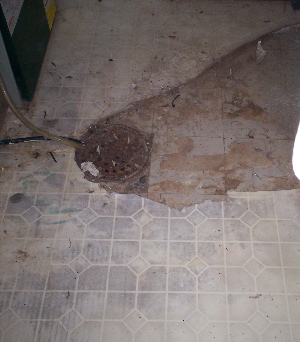
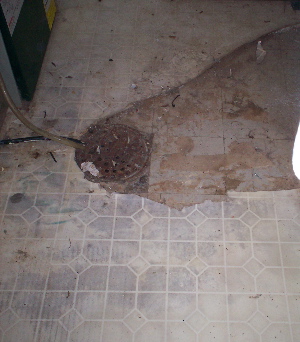
To top it all off, the two layers of flooring have been coming up – some places just one layer, and in other places both layers.
So, I cleared the room and started painting. I decided to paint everything – wall, ceiling, pipes and ductwork – the same color so this small room wouldn’t look so busy. Cost for paint and painting supplies – $45.
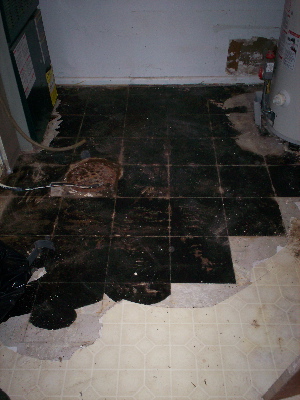
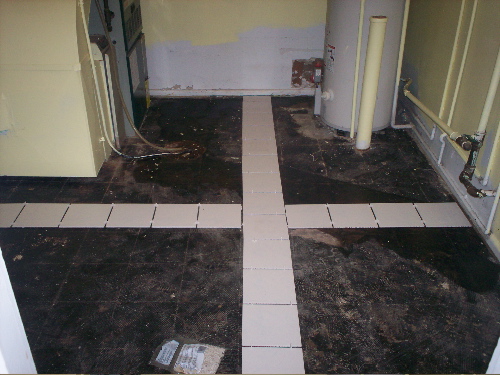
Then, I began to peel up the linoleum and scrap off the floor tiles. Thankfully, these both came up pretty easy. The black substance is the glue.
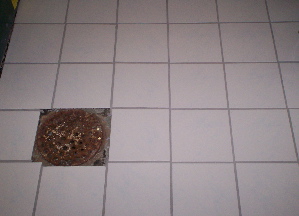
Then I tiled the floor. Check out HOW TO… Tile a Floor for this tiling project. Cost for tile $0 (They were extras given to me by a friend – she got them for 25 cents a tile which would make the cost of the tiles I needed $50. You can probably find very inexpensive tiles for a small space off of Craig’s List or a salvage yard.) Cost for tiling supplies – $47. I could have probably gotten these cheaper on Craig’s list if I had thought about it.
Ta da…
I did some additional painting of pipes and behind things I didn’t think could be seen – but I discovered that they were visible.
I found some white gloss paint leftover from a previous project. I used that to paint the baseboards.
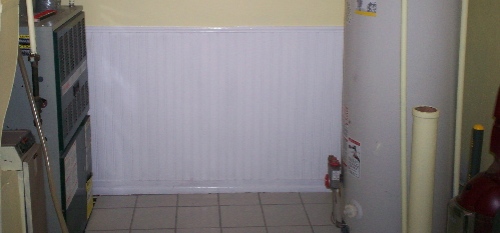
I then repaired the hole in the back wall, and placed wainscoting over the top as a decorative touch. I added molding to the top. I painting this the same color as the baseboards. The wainscoting and molding was a little over $26.
I also purchased inexpensive wall and shelf brackets. I already had shelves – given to me by a friend a few years ago. Cost of the shelf unit – $27.
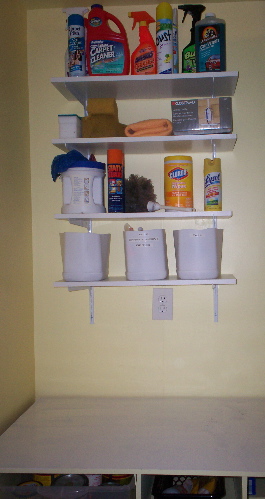
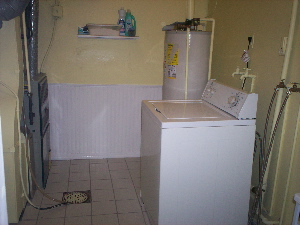
Done. Total cost of the project was $145.
- paint and painting supplies $45
- tiling supplies $47 – and about half of that cost was for tools that can be reused.
- wall repair $26
- Shelf $27
I still need to tile the top of the storage unit, but I have the thin-set, grout and tools needed. I just don’t have enough floor tiles left, but I have lots of different colored single tiles and I may do a mosaic – or I may just go buy some basic white tiles to finish the project.
BEFORE
AFTER
AFTER
Yes, I am pleased!
Posted in How To | Tagged Laundry room, re-do, tiling, up-date, update | 3 Comments »
My laundry room had linoleum over 12″ square hard floor tiles that were glued to the concrete floor. I know this because in various parts of this 8’x10′ laundry room I could see all of these three flooring surfaces. And, the linoleum was pretty badly worn where it still existed.
A few months ago a friend of mine gave me 10 boxes of 8×8 tiles – enough to tile this laundry room. It took me a while to get to it, but I did it!
Here’s the “How To” section – or at least the “How I Did It” section:
First off, pull up all the old flooring. I used a pry bar and that worked pretty well for the hard tiles underneath. I used a box cutter to cut manageable pieces of the linoleum so that I could pull them up and throw them away easily. The black stuff in the photo below is the old glue – but trust me, it was on there solid, so there was no taking it off.
Generally one would pull up the baseboards, but the baseboards in this room appear to have been liquid nailed to the wall – so I left the baseboards on (because I really had no desire to re-drywall this room.)
Then sweep and clean the floor surface well. I used a shop vac to get all the tiny pieces out of the corners – and everywhere else.
Items you will need:
- tile
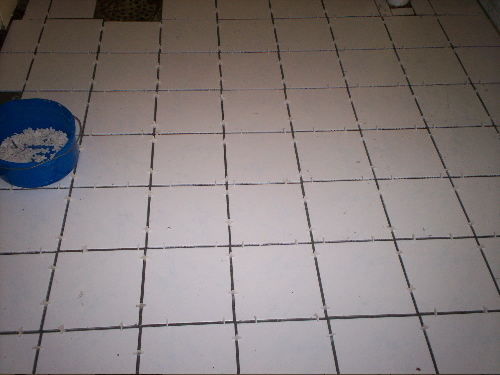
- tile spacers (1/8″ are used for vertical surfaces, for horizontal surfaces it appears to be a personal choice. I used 1/4″)
- notched trowel
- thin-set mortar
- a thick piece of wood or a heavy duty spoon or other type of tool for heavy stirring
- 2- large buckets (one for mixing the thinset and one for mixing the grout) I used an old cat litter bucket I got for free off of Craig’s List and one I got for a few bucks at the box home improvement store.
- tile cutter – can be rented at the box home improvement store – or borrowed from a friend as I did.
- grout (sanded is used for spaces larger than 1/8″) – make sure you take a tile with you when you pick this out – there were roughly 25 colors from which to choose when I decided.
- a grout float (which evidently is a type of trowel)
- large sponge (or two)
- bucket for cleaning out sponge in water
- grout sealer
- knee pads, or several thick towels – most of this work is done on your knees.
- For those over 40 – Advil or other pain reliever (trust me, you’ll need it) and perhaps a heating pad.
I called on a friend, Ed, who had tiled a number of times in his past. In previous posts I have referred to him as the “toilet guy.” Actually, Ed is your basic Renaissance Man – someone who can do almost everything – cook, tile, plumbing work, electrical work, sew, etc. (in addition to being an incredible friend.) Anyway, when I told him I was going to tile, he asked if I would like some help. Not being an idiot, I said “yes.”
Before Ed arrived I did a dry set. Basically, I lined up the tiles in both directions with the spacers to see if we would need to do any cutting of tiles. I discovered that from left to right (in the photo) no cutting would be required (yea!), but from top to bottom, we would need to cut half tiles for the back wall (which will eventually be covered up with my laundry sorter) giving me a full tile just inside the door.
Mixing the thin-set was difficult the first time because we did exactly as the instructions suggested – put the water in then put all the mix in, then stir. Much of the powder got stuck to the bottom of the container and I had to take a yard tool with a long handle to scrape the bottom of the bucket and stir with. The next time we made thin-set I put the water in, and then a little of the thin-set and mixed and added more of the powder mix and stirred and added the rest and stirred. This worked out much better.
The rest of the directions on the bag of thin-set were very clear and helpful, and included illustrations in larger type for easy reference.
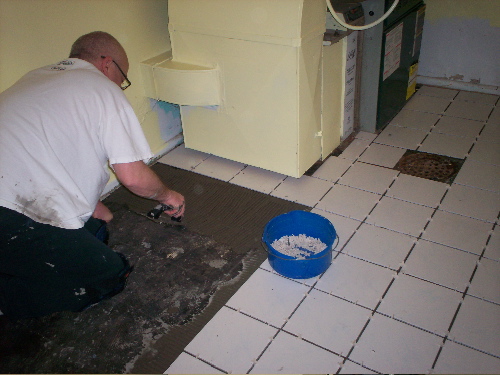
Bless Ed’s heart, he tiled when I had to leave and help my 100 year old friend who had fallen, and a good chunk of the work was done by the time I got back.
The basics for placing your tiles: Put your trowel into the thin-set and place thin-set on floor. Spread thinset over the entire area for each tile, then using the notched section of the trowel, scrape over the thin-set leaving some areas higher than the other, then place the tile. Insert the spacers and push into place. The tiles can be easily moved for quite some time if slight adjustments need to be made.
The dark area in the middle of the floor is the drain (which needs to be cleaned well and painted.) And, yes, I can see from this photo that I have some touch up painting still to do.
Cutting the tile was not as easy as one would think. BUY MORE TILE THAN YOU THINK YOU NEED! If there is any cutting to be done you will probably have tiles that don’t cut as you would like and that you can’t use. Remember when measuring for placing tiles that you need to reduce the cut by the grout on both sides.
As we were nearing the end of placing the tiles, we almost ran out of the thin-set. I grabbed a rubber spatula and scrapped the side of the bucket. That worked very well. It cleaned up with no problem when we were done.
Now is the time you will want to take the Advil and grab the heating pad. There is a reason that nothing can be done on the floor for the next 24-48 hours… the person doing the tiling is recouping. I spent the next 24 hours with a icy hot patch on my back, Ed went to the gym and walked or ran several miles on the treadmill. By the following day we were both in much better shape (obviously he was in the better shape.)
After 24+ hours, remove the spacers. First I started to individually remove these – but after about 10 I thought “there has got to be an easier way.” And there was! I took a broom and started sweeping the spacers into a pile. Not all of them moved, but at the end I only needed to remove another 20 by hand, the rest of the 600-700 spacers swept up easily. I put them in a plastic bag to reuse for my next tiling project.
After I removed the spacers, I went in and wiped off the dried thin-set on the tiles with a sponge. It doesn’t matter how careful you are, the tiles will probably get dirty as they are placed. No worry, the thin-set wiped off very easily.
The next part of the project is the grouting.
Mix the grout in a bucket as specified on the bag… except, add the powdered grout a little at a time to the water so it all gets mixed well and with less effort.
Take the float, load it with grout and push into the spaced area at a 45 degree angle. The directions on the bag of grout were very easy to understand and included step by step illustrations. Follow these. They include wiping off the excess grout gently after about 20 minutes, then waiting 2 hours and wiping off the film on the tiles (I did this twice.)
Take more pain reliever.
Wait a day or two.
Apply sealer to the grout – twice.
Take more pain reliever.
Move all the items from your laundry room out of the room or rooms in which you have been storing them (for me that means my washing machine is no longer in the middle of my kitchen, and the various storage tubs of items I took out of the folding table/storage unit are no longer under my kitchen table, and the 3x6x4 folding table/storage unit that I built several years ago is out of the hall leading to my sun room.)
Posted in How To | Tagged How To, tiling | 9 Comments »
Yesterday was a magnificent 76 degrees out at its high. Blue skies and just incredible for playing hooky. Unfortunately, I was not able to do that (although I know of others who did!)
Last night it rained. This morning, almost magically, everything looks so much greener outside. The lawn (even though it is still covered with leaves and gumballs) looks green, the iris and daylilies have joined the daffodils popping through the earth toward the sun. Even the mum plants are producing little green leaves.
The sky is a beautiful blue and it is another incredible day outside… and I am hoping to be able to enjoy a little of it later today.
Everywhere it is GREEN – and I love it.
Posted in Environment, Gardening, Personal Ramblings | 1 Comment »
Three weeks out with the flu, a week and a half well, than another week and a half sick with a nasty cold. I feel like I have spent much of this year in bed or on the couch.
I’m awake again, and have noticed it has gotten nice outside. The weather has been in the 50’s for a few days, and today it is raining lightly. I stepped outside for a few minutes and just breathed in the smell of spring. I just LOVE that scent.
I would very much like to be outside raking up the gum balls (hundreds – no thousands of them!) and the leaves that fell after my last clean-up in the fall – even in the light rain. I have discovered the daffodils popping up around my yard, and think about clearing away the leaves and mulching so that the green of the stems and eventually the yellow flower will be the clear star of the yard. I’m awake and moving and getting work done in the office, but my energy is still not 100%. This yard work will have to wait.
On Saturday I have a friend coming over to help me tile my laundry room (with leftover tile that was given to me), and will probably post a “How To” blog on tiling. I have finally finished painting the laundry room (I started before the flu hit), and pulled up almost all of the current flooring – several layers thick. It will be nice to put the room back together and actually be able to do laundry again. Last week I took all my laundry to a friends house to use her machines since my laundry room had been completely out of commission for over a month and I had already resorted to buying more “essentials.”
Enjoy the spring!
Posted in Environment, Personal Ramblings | 1 Comment »
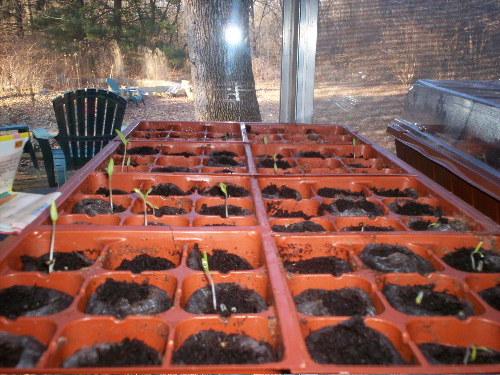
Yes, the seeds I planted earlier this month have finally started breaking through the soil in the potting flats in my sunroom. Now, there are many more seeds left to “pop,” but this sign of plant life always makes me happy. 🙂
Posted in Environment, Gardening | 1 Comment »
Yesterday I planted seeds in my sun room that should produce: 36 cherry tomato plants; 36 Roma tomato plants, 30 Beefmaster tomato plants; 12 yellow pear tomato plants and 6 Anaheim chili pepper plants. This is the latest I have ever started my tomatoes plants. As I stare at the snow coming down today, thinking of my tomato plants gives me hope for a more colorful yard and garden in the spring – I’m getting a little tired of the brown and white.
Posted in Uncategorized | Leave a Comment »
I spent much of Saturday cleaning carpets throughout my house. After the Friday fiasco, I decided I just needed to bite the bullet and rent a steam cleaner for the day and clean the carpets that had been “effected.” While I had the cleaner, I decided to shampoo all of the carpets in my house – and, well, there went most of my Saturday.
One hint, I did find industrial carpet shampoo that said it worked with residential steam cleaners in the cleaning products aisle at my local box home improvement store. There was twice as much product for almost half as much money as the name brand solutions sold next to the steam cleaners. I think it worked better than the other cleaners as well… so consider checking out the cleaning supplies aisles if you need carpet shampoo.
While at the home improvement store I also purchased tomato seeds. I still haven’t had a chance to plant these yet. I need to move some of my house plants to another room so I can make way for the seed starting trays I am recycling from last year (and get away from my computer long enough to do it.) Last year I started my seeds on January 15th and the year before it was only a week later than that – so I am behind on this planting.
I’ve calmed down a bit since my rant last week – but I did turn up my thermostat from 52 degrees to 58 degrees (still a very reasonable temperature), and I am feeling much more comfortable. And, in an attempt to clean out my laundry room so I can empty, paint the walls and tile the floors – hopefully very soon – I washed the rest of my laundry and took it all to the laundry mat to dry early Sunday morning.
I still skip a flush (or two) when I can, I don’t need to commute to work, so my driving is limited, I try and grow what food I can, and I am trying to be as aware as I can about how my actions impact the planet – but I am going to try and be less austere about it.
Posted in Environment, Personal Ramblings, Riot for Austerity | Tagged carpet cleaning | Leave a Comment »

